0

Wartime honey biscuits

A few weeks ago I borrowed a library book called Eating for Victory, but only got around to making something from it a few days ago. The book contains reproductions of second world war rationing recipe leaflets and quite a few of them are already made without eggs. Perfect for an often vegan baker! The recipe I choose to make actually isn’t vegan (it contains honey), but as my vegan boyfriend wouldn’t be over I decided to bake them anyway. Dad and I both love honey, so after flicking though the recipes with him I decided on honey biscuits.

When I began making them, there seemed like there was far too much raising agent, but the finished biscuits turned out fine. The dough was quite hard to roll out as it kept crumbling to pieces, but instead of adding more butter I kept working it and I eventually beat it flat. I first thought it would make less than the 40-50 estimated biscuits, but it went a lot further than I guessed and made 39 good-sized biscuits.

20141015_205621

Golden, honey biscuits

The smell of them coming out the oven was gorgeous and their golden brown colour was really inviting. Despite my mum’s warnings about how the recipe would yield nothing but disappointing biscuits, “I bet they don’t even have butter in”, they turned out well. A good, simple eat-with-your-cup-of-tea biscuit. Although I did find they went soft remarkably fast.

20141015_205656

Lots and lots of biscuits

I’ve now got my eye on a couple of other recipes in the book and might even buy the book if the next recipe turns out as well.

If you’d like to make your own honey biscuits:

2 ½ oz margarine (I used dairy-free Stork ‘butter’)
1 oz sugar
2 tbsp honey
6 oz plain flour and 3 tsp baking powder
1 tsp cinnamon
pinch of salt

  • Pre-heat your oven to 180°C (it just says a ‘moderately hot oven’ and 180 seemed to work)
  • Cream together the butter and sugar.
  • Add the honey and work in the flour, cinnamon and salt.
  • Roll out your dough to around ¼ inch thick (have patience! You will manage it!), cut into rounds and place on a baking sheet.
  • Bake for 10 minutes.
2

Pumpkin oatmeal cookies

Last weekend, my boyfriend an I went to a science museum and – to my massive delight – got to have a go at grinding our own flour! I’ll spare you the photo of me with my huge, cheesy grin though. I wanted to make something with it asap and because mum had an allotment-grown pumpkin waiting to be used I decided to make some pumpkin cookies. (A warning now for following photos, these cookies aren’t lookers, but they’re tasty).

20141011_155411

Home grown pumpkin

I’ve grown up only eating pumpkin in savoury food and last year was the first time I had ever tried pumpkin in a sweet dish … and I wasn’t impressed. Last Halloween, I made this pumpkin pie from Vegan Pie in The Sky. Mum, my boyfriend and I thought it was pretty horrible, but my dad ate the whole thing, so it wasn’t wasted anyhow. This year, I thought I’d try a pumpkiny something which was less labour intensive: pumpkin oatmeal cookies! These were much more universally enjoyed! The recipe was from my Vegan With a Vengeance cookbook, although if you fancy making them, the recipe is also on her site.

20141012_160906

Not the prettiest biscuits in town, but delicious

In place of raisins, I made some of the batch with chocolate chips for my raisin-hating boyfriend. While chocolate and pumpkin were nice, I preferred the raisin ones. Now I’ll be the first to admit that they don’t look pretty, but they were delicious! Over that weekend I made two batches (a trial 12, then a “yum, these are good, we need more” batch of 24) and they were all eaten. I adore oats (I eat a huge bowl of porridge every morning) and the subtly spiced pumpkin goes really well in an oaty cookie. I followed the recipe except for using wholemeal flour in place of plain, vegetable oil in place of canola, and instead of molasses (do we even get that in the UK?) I used maple syrup. I’d definitely recommend making them.

It was nice to think they were made with our freshly ground, wholemeal flour and home-grown pumpkin. As you can see below, they tasted too good to even wait ’til they’d cooled before eating/photographing them.

20141012_154950

Cooling pumpkin oatmeal cookies

0

My first crocheted animal and a chocolate, walnut and banana loaf

I’ve just started a new job and after concentrating on a computer screen all day I haven’t wanted to come home and type up my crafting adventures, so I’ve got a couple of bits saved up to share today.

Most importantly, I made a little progress with my crochet! I made this little rabbit!

20141012_175543

My first crocheted animal!

It’s made from the Little Rabbit pattern from Pops de Milk’s cuteness Emporium. My rabbit is this unnatural green because I find this particular yarn a lot easier to crochet with than all my other wool. I find I can see the stitches really clearly and it’s the easiest I’ve found to work with. I wish I knew what it was made from so I could buy more.

20140922_215305

Pale green pants?

The pattern was easy to follow and with the help of some youtube videos on how to do the stitches I didn’t have too many problems. I think my stitches were a little too tight as I found myself with such a small hole near the close of the head that I had to undo part of it and stitch it up a couple of rounds early to stop it looking pointy. I thought I’d find joining the legs together difficult, but with a youtube video to help me, it was easy. This stage with just the legs made reminded me of the Dr. Seuss poem about the pale green pants, which I think is called What was I Scared of? I wasn’t a huge Dr. Seuss fan as a child, but I remember being unnerved by that one. Not a great start for a cute little bunny!

The bit I found most frustrating was joining all the pieces together. I don’t usually mind joining pieces, but for some reason this one just didn’t seem to want to do what I wanted. Look how many bits there are!

20140922_222616

All the pieces

However, I finally joined it all together. The body is a bit long and I’m wondering if I might have accidentally added on an extra round or two by mistake, but I think he’s rabbit-y enough for my first, finished 3D piece of crochet. I’m quite pleased with myself.

His greenness doesn’t make him the cutest rabbit around, but he’s now helping my knitted kitten guard one of my book shelves. You don’t need cuteness for an important job like that!

20141012_175334

Kitten and rabbit guarding my books

Last weekend I also made a delicious chocolate, walnut and banana loaf. I used to make a lovely no-added-sugar banana and walnut bread at university which was perfect if I found myself running to a lecture and needed a snack to keep me going, but I can’t seem to find my recipe any more.

This chocolate, walnut, banana loaf is of the far more cakey variety. I’ve made this recipe countless times now and it was nice last week as a mid-afternoon snack to keep me going at my new job. The recipe is from Ms Cupcake’s The Naughtiest Vegan Cakes in Town. I’ve had mixed results from the recipes in this book, often finding them too sweet, but this loaf recipe is a keeper. Despite being sweet and cake-like, it’s not an elegant loaf: it’s HUGE and doesn’t tend to cut into the neat slices, but it’s very yummy and moreish.

20141005_184421

My huge Chocolate, Walnut and Banana Loaf

It’s really great to be in a new job, but I’m going to have to get a little more organised with my lunches. I used to just wolf down peanut butter sandwiches for lunch in my last job, but I now have a whole hour for lunch so can actually savour my food! There are so many great looking blogs filled with lunch ideas out there, I’m going to have to have a good look this week.

0

Tiny cupcakes

It was National Cupcake Week last week so on Friday I baked some mini cupcakes. I’d bought some mini cases last time I was in the supermarket and had been looking for an excuse to use them. Cupcake week was the perfect excuse! I wasn’t sure what flavour I was in the mood for so made a variety: Bakewell Tart, Chocolate and Orange, Chocolate and Ginger, and Vanilla. The cupcakes were tiny, so they only took 10 minutes in the oven and cooled really quickly. Waiting for cakes to cool before I can ice/eat them seems to take an age, so it was great to be able to get decorating (and eating) them so quickly.

wpid-20140919_160054.jpg

They’re so tiny, I can eat four in one go, right?

I used a base cupcake recipe from Vegan Cupcakes Take Over the World called Golden Vanilla Cupcakes. You can find the recipe online here, although if you haven’t yet got a copy of the book, it should be added to your ‘must buy’ list. I made the oil version and reduced the amount of vanilla essence so it would take on other flavours better. I separated the mix into four parts and made four flavours of cupcakes from it.

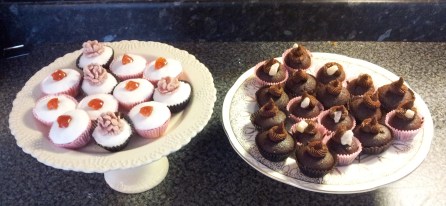
The Bakewell cupcakes were flavoured with almond essence and once baked filled with a small amount of raspberry jam, covered with royal icing (ready to roll, left over from my Rubik’s Cube cake) and topped with a small piece of glacé cherry.

wpid-20140919_155701.jpg

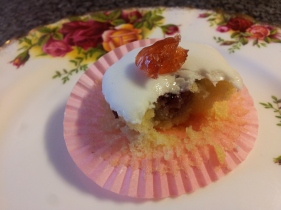
Bakewell cupcake with the jam inside showing

Both my dad and my boyfriend like bakewell tarts so I made this one for them. I’ve previously baked Bakewell cupcakes with pastry as the base and a butter-cream icing, but wanted to keep it incredibly simple for these tiny versions. Strangely, although they were the first to go in the oven (and so had the least amount of time for the raising agents to activate before being baked), they rose the least. This suited me as it meant that they were easier to ice, but I thought it was a little odd: normally the quicker you get the mixture in the oven the more the rise. Anyone know why this didn’t happen?

The vanilla cupcakes were sickeningly sweet: topped with white royal icing and my first attempt at an icing flower. It’s from a set of carnation cutters (like the ones here), but my boyfriend thought it was some sort of nut on top so clearly I didn’t achieve a particularly close likeness! It was good that they were so small or else the sugariness would have been too much.

wpid-20140919_155452.jpg

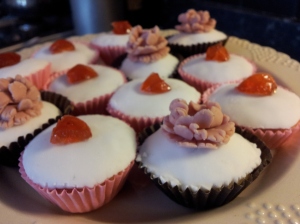
Bakewell and Vanilla cupcakes

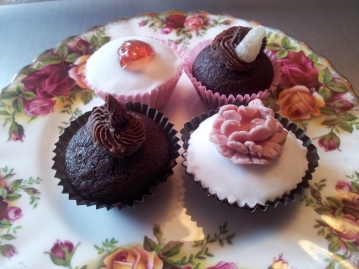
The Chocolate and Orange cupcake sponge was flavoured with cocoa and orange essence and topped with plain, not-too-sweet chocolate butter-cream icing. I would have added a piece of candied peel, but didn’t have any to hand. When I went away a few weeks ago I made chocolate cookies with my friend (baking his first ever batch of cookies!). They were meant to be Chocolate and Orange cookies, but nowhere sold orange extract so they ended up as “just” chocolate. I think I was still in the mood for chocolate-orangey-ness when I made these cupcakes.

The Chocolate and Ginger cupcakes were flavoured with cocoa and LOTS of ginger powder then topped with chocolate butter-cream icing and a bit of crystallised ginger. I adore ginger so I made them extremely gingery. My mum (a big ginger fan) declared them a bit too spicy, my dad wasn’t a fan (he doesn’t like ginger) and my boyfriend didn’t want to try then. However, despite being a little dry I loved them! :p That’s the best thing about baking: you can make things exactly as you like them.

wpid-20140919_155334.jpg

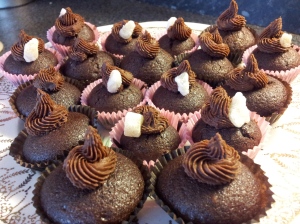
Chocolate, chocolate, chocolate

They were all fun to make and it was nice being able to eat multiple cupcakes in one portion. I think the Bakewell cupcakes look especially cute and I’ll definitely make them again.

20140919_155211

My mini cupcakes

We went to my cousin’s for birthday tea on Sunday and he had a red velvet cake from Sainsburys. My dad – who normally doesn’t like chocolate sponge and had never eaten red velvet cake before – asked me if I could bake one for him at home. I have attempted red velvet cake before, but vegetarian food colouring has always let me down. Plus, only having eaten red velvet cupcake once in my life a few years ago (from a Hummingbird Bakery take-away van!), I can’t entirely remember what it’s supposed to taste like. Cocoay with cream cheese icing, I think? Maybe I’ll just miss out the colouring on my next attempt?

4

Little knitted carrots and a crocheted flower

It’s been a few weeks since I wrote a post as I’ve been away seeing friends, but that doesn’t mean I haven’t been crafting! For Christmas, my mum bought me a book called 100 flowers to knit and crochet by Lesley Stanfield, which is filled with patterns for crocheted and knitted flowers, fruit and vegetables. I decided to continue to learn to crochet by making one of the flowers from the book. Apparently I used a pattern for a meconopsis, but I used pink wool instead of blue. I’m pretty sure I didn’t follow the instructions properly because I got to the end of the instructions and there was still a bit of space around the middle, but I just added in an extra petal so it wasn’t a problem. I’m glad I had this problem on a flower and not on another project, as having to add in an extra leg on an animal might be more conspicuous ;). It isn’t perfect, but it definitely looks like a flower so I’m happy!

20140912_145007

It was my mum’s birthday last week and she loves gardening. I’ve probably made her more cards with flowers on than I can count, so instead I knitted three little carrots and sewed them to the birthday card. I used this cute pattern from Flutterby Patch. The carrots knitted up fairly quickly and I enjoyed knitting them as I caught up on the previous week’s Doctor Who episode (I’m a big fan of the new Doctor!).

20140912_183227

Perhaps stuffed knitting isn’t the most ideal for a card, but I’d intended to make them into brooches or key-rings before attaching them to the card so they could potentially serve as a little gift too. However, my local craft shop didn’t have any brooch backs or key-rings so I ended up just stitching them straight onto the card. It just about managed to fit in an envelope okay, but would have been too bulky to send as a regular card through the post. One problem is that when the card is standing up the green carrot tops droop a bit, so I should have perhaps stuck them down with a dab of glue. I do think the card looks quite sweet :).

Hopefully you’ll see more of my attempts at crocheted flowers here soon. I also fancy making Flutterby Patch’s knitted radish pattern on the same page as the carrot. They reminded me of Luna Lovegood’s earrings.

0

Coffee cake and cupcakes

After an extremely busy time last week, it was glorious to be able to relax this last bank holiday weekend. I spent Saturday relaxing and baked some coffee cupcakes. There was more mix than would fill the 12 cupcake liners so I made a small round coffee cake too and topped it with walnuts.

107

I never liked coffee cake up until the point I baked my own. In fact, the reason I first baked it was because I was fed up of eating so much of the cake I baked, so thought I’d bake a flavour my parents liked but I didn’t! It turns out that while I didn’t like supermarket coffee cake, I loved homemade coffee cake!

I’ve made this recipe countless times now and it’s my go to coffee cake recipe and just happens to be vegan. My now boyfriend (then just friend) sent me the link and I baked it for him as a thank you for helping me proofread one of my university reports. There were no romantic intentions in mind on either side, but I’m convinced this coffee cake might have contributed to him seeing me in a positive light ;). Over a year later and I took some of these cupcakes with us on a day out (to see a book themed sand sculpture festival!) over the bank holiday weekend.

If you want a good, light textured coffee cake definitely try this recipe from The Vegan Baker, it is really scrummy.

A couple of things about the recipe:

I would recommend making the coffee for the recipe and the icing first so it has time to cool down by the time you use it. I use slightly less sugar than the recipe (1 3/4 cups instead of 2 cups) but otherwise follow it exactly. I usually divide the mixture between two or three tins or you can make cupcakes out of it. I was worried that the mix would be too liquidly for the cupcakes, but they were fine. I baked the cupcakes for about 30 – 35 minutes.

While The Vegan Baker’s sponge recipe is fab, I generally use this coffee icing recipe instead of the suggested one:

Coffee icing (covers 12 cupcakes and lightly fills and covers a small coffee cake, if you like a generously filled cake I’d make a bit more).

  • ½ cup (dairy-free) butter. Use the stick type, not the spreadable kind in a tub.
  • 1 cup icing sugar
  • 1 tbsp boiling water
  • 1 tbsp instant coffee granules
  1. In a mug, dissolve the coffee granules in the boiling water and mix thoroughly until fully dissolved. Leave to cool completely. (I often put it in the fridge).
  2. In a separate bowl beat the butter until soft then sift in the icing sugar. Beat well with a fork until it’s combined.
  3. Slowly (small drops at a time) add in the cooled coffee mixture and mix.
  4. The icing is then ready to use.

105

0

Scones, a granny square and a tiny, accidental sorting hat

The last week has been incredibly busy. Lots of travelling, two job interviews and volunteering. I haven’t even had time to relax and watch this week’s The Great British Bake Off yet?!

It’s been sunny (although I haven’t had time to enjoy it) the last few weeks and it’s put me in the mood for British tea time food: scones, fairy cakes and cups of tea. The last time I baked scones was last year as part of my graduation day picnic. Instead of going out to a restaurant in the daytime we put together a small picnic and ate it in a park between picking up my robes and my graduation ceremony. It was a sunny day and it was lovely to enjoy home-made scones outside :).

When the mood to eat scones came over me last week, I couldn’t remember where I got my graduation day scone recipe from, so instead tried a new recipe for some apple and cinnamon vegan scones. It’s the first recipe I’ve tried from The Cake Scoffer by Ronny (a small pamphlet with around 20 recipes in).

They may look a bit rustic, but you’re in fact looking at one of the most delicious batches of scones ever. Crumbly on the outside, melt in the mouth with you bite into it delicious. I’ll definitely be making them again! They seemed to go stale much, much quicker than previous scones I’ve made though, but luckily we ate most of them on the day of baking, still slightly warm from the oven. Yum.

20140813_213710

I have also had a second attempt at a crocheted granny square. It was a LOT easier using less fluffy wool and I realised that I actually need to pay attention where a stitch tightens itself in a hole, instead of leaving it to its own devices like I do when knitting. I’m still a bit rubbish with tension and I find that if I’m not careful the stitches are faaar too tight to ever get a hook into them again! I’m quite happy with it though as I feel like I was starting to get bored while making it and that’s always a good sign for me: it means I’m getting it!

20140823_161638

While looking for a different crochet hook I found my first attempts at crocheting from a few years ago. You can see why I gave up! The pink thing is meant to be a heart, I think, and the black thing was me practising following a 3D crochet pattern from some amigurumi book. It clearly went really wrong.

20140823_161929 20140823_162839

However, while it might not have ended up resembling any part of an animal, it could become mini me’s first step to going to Hogwarts! Although I never received my Hogwart’s acceptance letter, it doesn’t mean she can go. She looks like she could be being sorted in this picture (her bushy hair stops the sorting hat from falling over her eyes!).

20140823_162246

0

Creative blog hop

The lovely Jen over at Tea & Knitting tagged me in a creative blog hop. She blogs about knitting and crocheting and loves everything penguiny and Harry Potter. I previously blogged about a great crocheted frog purse she made.

My blog hasn’t been running too long at the moment and while I also draw, knit and generally make things I haven’t made much in the last few months except cakes, but I’ll do my best answering the four questions I’ve been asked to answer about my creativity :).

1. What am I working on?

I’m not working on anything specifically at the moment. I want to learn to crochet so I’m supposed to be ‘working’ on that (you can see my first attempt at the beginnings of a granny square here). I don’t tend to knit big projects (in fact, I like to work on really tiny things like my mini-me) so I finish most of my projects in one go. I like finding good vegan recipes or messing around with my own so that’s always an ongoing project!

2. How does my work differ from others of its genre?

Because I’m a novice crafter, I don’t think it does? What I love about making things is that I can create things I want and make them personal. I love setting myself the challenge of making a cake vegan or adapting a knitting pattern. There are lots of mistakes along the way, but I’m okay with that.

3. Why do I write/create what I do?

I have always been creative and have enjoyed making things and drawing since as long as I can remember. I took the creative route through school and even went to art school to study Architecture, but then decided that I didn’t love buildings as much as everyone around me and transferred to study English Language, my other love.

I love creating things because I can make something exactly how I want it. When I found out I was lactose intolerant a few years ago I was so glad I could bake as it meant I could adapt my recipes and still eat all my favourite cakes without having to hunt out a vegan cafe whenever I fancied a slice of something. I LOVE learning and trying new things (I actually just got my grades back for the Chemistry AS evening class I took this year!) and I think my creating is an extension of my nerdiness. While following a recipe or a pattern is enjoyable, I love working out how to adapt them; for example figuring out how a small alteration might affect a finished piece of knitting.

4. How does my writing/creating process work?

I’m a fairly novice crafter compared with lots of people so while I often adapt patterns and recipes I don’t often design them entirely from scratch. I have a massive favourites list on my web browser and on my Pinterest crafting board so when I fancy making something I often look on there to see what I fancy.

As part of the blog hop I’m tagging Moomie Swan’s tumblr. Here she shares her doodles and ideas. You can also check out her website here. Moomie and I have known each other since we were children and used to make and draw stuff together. She’s now all grown up into a fab illustrator. She has a graphic novel style to her illustrations and I’d definitely recommend checking her work out. She’s been working on some illustrations of pirates, which I really love!

0

A very chocolatey Swiss roll

On Sunday I made my first ever Swiss roll inspired by The Great British Bake Off! I’ve never made a Swiss roll before and looked for a vegan recipe online. I was disappointed to read that apparently a good vegan Swiss roll recipe is almost as difficult to find as a vegan meringue recipe. I did find a few yule log recipes, and figuring this was just a chocolate Swiss roll I decided to use the Buche De Noel (Yule-Log Cake Roll) recipe posted here.

I was watching an episode of BBC’s Merlin (I’ve just started watching series one) when I was making it so wasn’t concentrating and accidentally doubled the amount of cocoa the recipe asked for (opps!) so ended up with a very chocolately roll. I thought that a light coloured filling would show up the swirls I was optimistically hoping for so filled it with coconut cream. While it definitely isn’t as perfect as the contestants’ rolls, I’m quite impressed with myself! I had kinda expected it to crumble apart in my hands. I think it would certainly be identified as a Swiss roll!

20140810_14475520140810_145039

It’s definitely split a bit, which happened when I unwrapped it after cooling to put the filling in, but I’m quite pleased with the end result! You can see how it’s splitting in the picture below. That tea towel was utterly COVERED in chocolate by the end.

Pre-filled Swiss roll

Before filling the Swiss roll

It’s extremely heavy and rich so the light coconut filling doesn’t quite work. I’d use the same recipe again, but maybe cook it for a wee bit longer and fill it with a more rich filling like coffee or chestnut. If you were looking for a heavy, chocolate kick it would be perfect. Looking forward to this week’s Bake Off now :)